
There’s a moment every driver has experienced at least once. You pull the dipstick, squint at it, see what looks like oil somewhere on the stick, and convince yourself everything’s fine. Then you do it again a week later and get a completely different reading. Same car, same oil, different number. That’s not the car messing with you that’s almost certainly a reading error, and it’s far more common than any dipstick reading guide will tell you upfront.
I’ve watched this play out on my own cars for years. The first time I ever checked oil properly I mean actually properly was after I got a Honda S2000 that made the dipstick nearly impossible to read with clear oil. That car forced me to slow down and learn what the stick was actually communicating. Since then, I’ve approached every dipstick oil level like a diagnostic tool rather than a formality.
What the Markings on Your Dipstick Are Actually Telling You
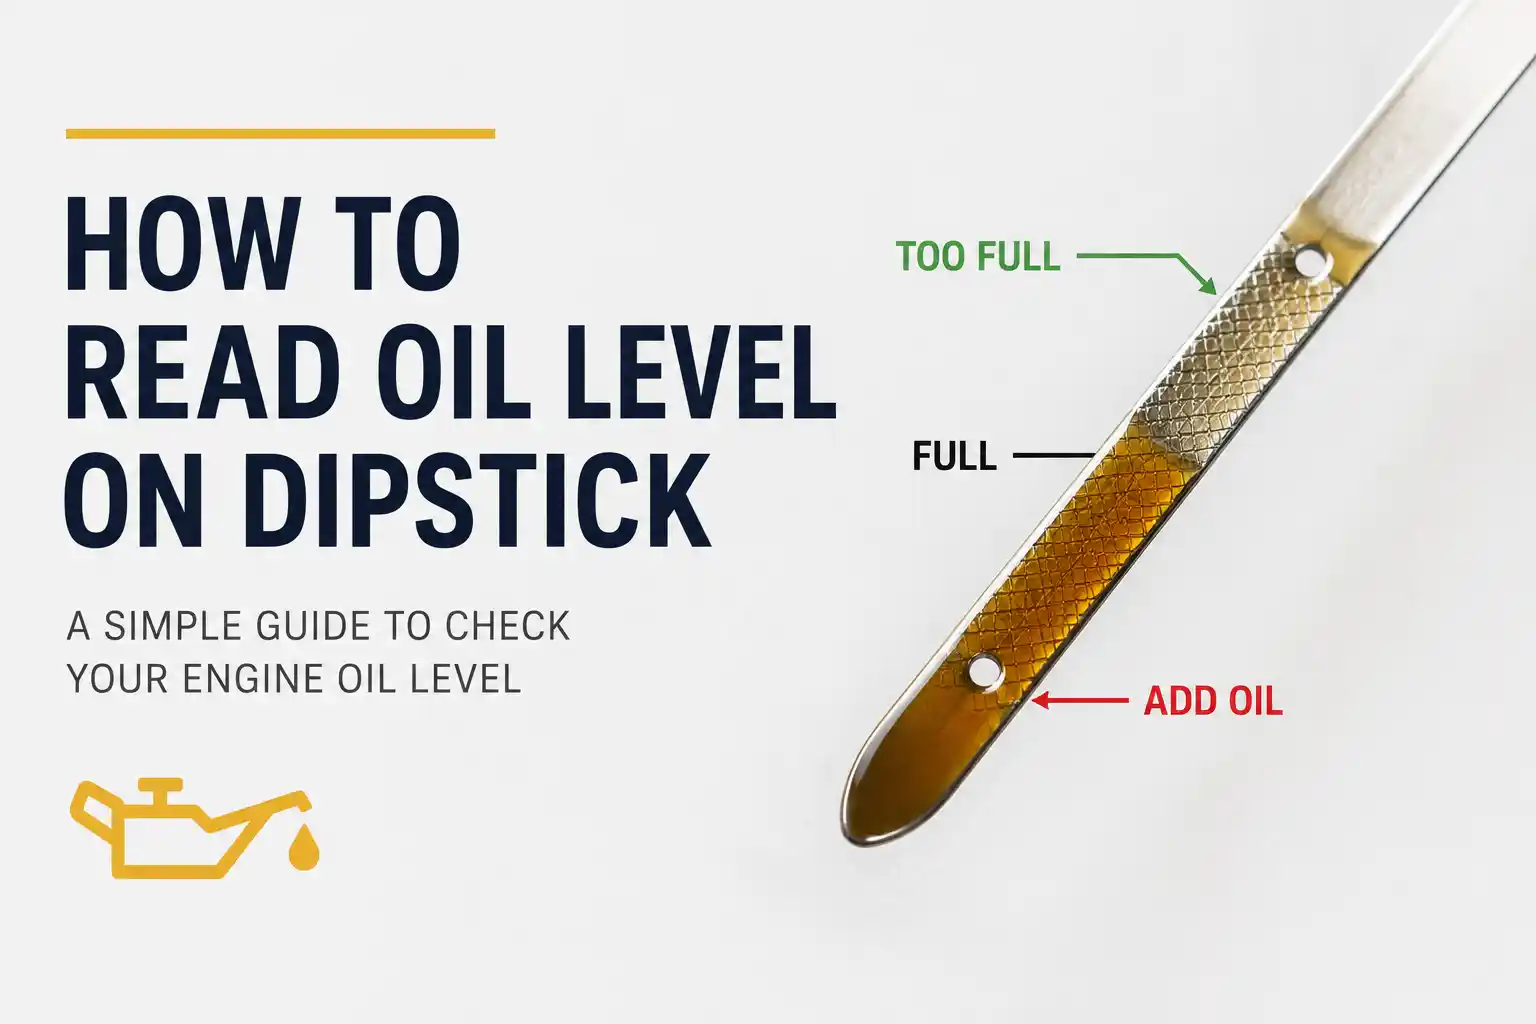
Before anything else, you need to understand what you’re reading. Not every dipstick uses the same system, and that’s where most confusion starts. The calibrated indicators at the bottom few inches of the stick come in several formats depending on the manufacturer. Some carmakers stamp F and L directly onto the metal full and low, plain and simple. Others use the letters H and L for high and low, or the abbreviations MIN and MAX. Many modern vehicles use a crosshatch area a crosshatched section etched into the tip where the safe operating range sits between the upper crosshatch and lower crosshatch boundaries.
Then there are dipstick dots. Two pinholes or two dots punched into the stick represent the same concept: bottom dot means low mark, top dot means full mark. The oil level on dipstick should sit somewhere between them. On a four-dot dipstick which isn’t common but does exist the top dot marks full for hot oil, the next hole down is the maximum for cold oil, and the lower two holes represent the low range at operating temperature and cold respectively. That’s a 4-dot dipstick hot cold marks explained in one sentence, but it trips people up constantly because almost nobody explains it.
What all these formats share is the same message: the oil film level needs to sit within the ideal range, not at the absolute full mark and certainly not below the minimum mark. Oil that registers at or above the max line on a hot reading isn’t a cause for celebration it may signal an overfill, a coolant leak rising the level, or water condensation in the crankcase from short-trip driving.
The Single Biggest Reading Mistake You’re Probably Making
Most drivers pull the dipstick, glance at it, and read what they see. That’s the reading first swipe dipstick error, and it almost always produces a misleading result. Residual oil clings to the sides of the dipstick tube as you pull it out. That residual oil transfers to the stick and creates a false high reading that has nothing to do with what’s actually sitting in the oil pan.
The correct process starts with wiping the dipstick clean use a clean rag, a paper towel, or a lint-free cloth then reinserting it fully. Push dipstick all the way in until it seats completely. A dipstick that isn’t fully seated produces a false reading unseated dipstick situation where the level reads lower than it actually is, which leads to unnecessary topping up and eventual overfill. Once it’s seated, wait a moment, then pull dipstick out again slowly and read both sides.
Here’s the part that surprises most people: one side of the dipstick will often show a higher reading than the other. This dipstick angle discrepancy is caused by the angle of the dipstick tube entering the sump. When the tube doesn’t enter the oil pan vertically which is the case with many engines including the 3.6L Jeep and various Subaru layouts the stick picks up oil unevenly on each face. The lower side more accurately reflects the true level. Always read the lower side. Reading the wrong side can represent a 0.19 quart volume difference, which sounds small but matters when you’re trying to avoid the PCV system blowback that comes from oil blown into intake from overfilling.
Hot vs Cold: Which Reading to Trust and Why It Actually Matters
This is where dipstick reading genuinely gets technical, and where forums like BobIsTheOilGuy and Subaru Outback Forums have produced thousands of posts from people chasing inconsistent readings.
Oil expands when hot and contracts when cold. At 15°C, oil is approximately 7% denser than at 100°C. For a 5L sump, that oil density cold vs hot difference translates to roughly 350ml the oil level rises after shutdown as the oil cools and becomes denser, and simultaneously as oil drains back from the upper engine areas into the pan. The cold dipstick reading higher that many drivers notice isn’t imagination: the oil is genuinely at a higher physical level in the pan when fully cold, but that reading is also more stable and consistent.
The overnight cold check best method parking flat, letting the car sit untouched, then pulling the dipstick first thing without wiping gives the cleanest, most consistent reading on most vehicles. For cold method specifically, do not wipe before cold check; seat the dipstick by pushing it down first, then draw it straight out and read it. The oil level shows as a straight line across the dipstick when done correctly, instead of the V-shaped oil reading error you get when oil has been dragged up the tube.
For a hot reading method, the standard is to check 5 minutes after shutdown with a fully warmed engine on a level surface. This is also reliable, but warm oil level variable between vehicles means you may see slightly different numbers than a cold check. Neither method is wrong consistency is the point. Pick one approach, establish a personal dipstick reference point right after a known-correct oil change, and use that reference for all future comparisons.
Reading the Oil Itself — Colour, Condition, and What to Do Next
Oil level on dipstick is one conversation. Oil condition is another, and they’re both worth having at the same time. New, clean oil appears as a golden oil or honey brown oil slightly translucent, with a slippery feel between the fingers. As heat cycles accumulate combustion byproducts, the oil darkens steadily through amber oil to dark oil and eventually black oil. That darkening alone doesn’t mean you’re due for a change; follow the manufacturer-recommended oil change interval rather than colour alone.
What does demand attention is oil that looks like milky oil or has a chocolate milk oil appearance that’s the visual signature of coolant leaked into engine. When coolant mixes with motor oil, the emulsification creates that pale, creamy coating. Check simultaneously for white exhaust sweet smell at the tailpipe, as these two signs together confirm a coolant contamination situation. A raised oil level on the dipstick without any oil having been added alongside brown bubbles dipstick or dried crusty brown residue above the oil level line on the stick supports the same diagnosis.
Metal particles dipstick findings shiny flecks, metal shavings, or metal flakes visible in the oil point to internal engine wear: piston ring wear, cylinder wall damage, or bearing damage. These aren’t cases for a top-up; they’re cases for a compression test, a leak down test, or a borescope inspection of the cylinders.
For water contamination, the crackle test remains the most accessible field test: place a drop of oil from the dipstick onto a hot exhaust manifold. If it crackles with a sound like bacon frying, free water or emulsified water is present in the oil. Fuel diluted motor oil from engine blow-by is identifiable through diesel smell dipstick that unmistakable fuel odour pulls the additive concentration thin and degrades the oil film long before the colour changes visibly.
The Overfill Problem Nobody Talks About Enough
Overfilling engine oil is treated as a minor issue, but the engineering reality is more serious. Once the oil sits above the full mark and the crankshaft begins rotating at operating temperature, oil churning begins. Crankshaft churning oil creates aerated oil engine oil saturated with tiny air bubbles and frothy oil cannot form a solid lubricating film between moving parts. Bearings need continuous, unbroken oil film coverage. They don’t function correctly on foam. Oil pressure increase overfill from too much volume puts stress on seals and gaskets that weren’t designed to resist it, accelerating their wear and eventually producing leaks.
If overfilled, drain excess oil rather than driving on it. The one quart difference MIN to MAX that exists on most dipsticks is the entire operating buffer overfilling by just half a quart puts you meaningfully outside the safe crosshatch marking. Even a half inch above full mark reading should prompt action, not reassurance. The oil light flickers cornering or oil light flickers braking symptoms often trace back to both ends of the spectrum: a level too low to maintain pressure during dynamic lateral load, or oil so aerated from overfilling that consistent oil pressure becomes impossible.
2 thoughts on “Check How to Read Oil Level on Dipstick”